# 简介
1、首先来了解一下什么是Docker:
Docker 是起源于 Linux 上的技术,是基于 Linux 内置的 Namespace 和 CGroup 等系统内隔离机制而抽象出来的一种轻虚拟化技术。
微软与 Docker 在 2014 年宣布了合作,以期将容器技术带到 Windows Server 操作系统,并为传统的 Windows 应用程序的容器化改造提供更直接的支持。
与 Linux 类似,Windows 也新新抽象出来了 CGroup 和 Namespace 的概念,并提供出一个新的抽象层次 Compute Service,即宿主机运算服务(Host Compute Service,hcs)。相较于底层可能经常重构的实现细节,hcs 旨在为外部(比如 Docker 引擎)提供较稳定的操作接口。
Docker 可以以两种形式运行在 Windows 上:以 Hyper-V 虚拟机的形式运行 Linux 格式的容器,或者运行原生的 Windows 容器。其中前者运行 Linux 格式的应用程序,后者能运行 Windows 应用程序。
2、如何在Windows上面安装docker?
如果安装了win10,可以采用安装包直接安装,现在 Docker 有专门的 Win10 专业版系统的安装包,需要开启Hyper-V。
3、然后来了解一下什么是Hyper-V: Hyper-V是微软的一款虚拟化产品,是微软第一个采用类似Vmware和Citrix开源Xen一样的基于hypervisor的技术。Hyper-V 让你可以在 Windows 上以虚拟机形式运行多个操作系统。
官方文档提示:HYPER-V 在 64 位版本的 Windows 10 专业版、 企业版和教育版上可用。 不适用于家庭版。
# Windows 10家庭版 安装HYPER-V
默认情况下win10家庭版是没有hyper-V的,但将如下复制到.cmd文件中并执行,可完成hyper-V安装,是可以使用hyper-V的。
pushd "%~dp0"
dir /b %SystemRoot%\servicing\Packages\*Hyper-V*.mum >hyper-v.txt
for /f %%i in ('findstr /i . hyper-v.txt 2^>nul') do dism /online /norestart /add-package:"%SystemRoot%\servicing\Packages\%%i"
del hyper-v.txt
Dism /online /enable-feature /featurename:Microsoft-Hyper-V-All /LimitAccess /ALL
2
3
4
5
6
7
以管理员身份执行hyperv.cmd文件。
如果系统要你重启,便重启。
完成安装后

然后以管理员身份打开cmd。 执行如下命令:
REG ADD "HKEY_LOCAL_MACHINE\software\Microsoft\Windows NT\CurrentVersion" /v EditionId /T REG_EXPAND_SZ /d Professional /F
可以伪装成win10专业版。
注意
安装Hyper-V服务之后,发现开启不了VMware里的虚拟机,每次都提示需要禁用Device/Credential Guard。
参考解决:
# 下载Docker for Windows及安装
官网下载链接(需要一点科学手段): https://store.docker.com/editions/community/docker-ce-desktop-windows 国内镜像: https://oomake.com/download/docker-windows (百度网盘) [https://mirrors.ustc.edu.cn/docker-ce/]https://mirrors.ustc.edu.cn/docker-ce/)(版本更新不及时)
下载后直接安装,安装时注意取消勾选window容器(默认不会勾选)。
Docker安装成功后,执行cmd命令
docker version
就可以验证安装是否成功。
参考文档
https://blog.csdn.net/tidu2chengfo/article/details/84892915
https://www.cnblogs.com/samwu/p/10360943.html
# Docker使用
# Docker 镜像加速
国内从 DockerHub 拉取镜像有时会遇到困难,此时可以配置镜像加速器。Docker 官方和国内很多云服务商都提供了国内加速器服务,例如:
网易:https://hub-mirror.c.163.com/ 阿里云:https://<你的ID>.mirror.aliyuncs.com 官方中国加速器:https://registry.docker-cn.com ustc 的镜像:https://docker.mirrors.ustc.edu.cn
当配置某一个加速器地址之后,若发现拉取不到镜像,请切换到另一个加速器地址。国内各大云服务商均提供了 Docker 镜像加速服务,建议根据运行 Docker 的云平台选择对应的镜像加速服务。
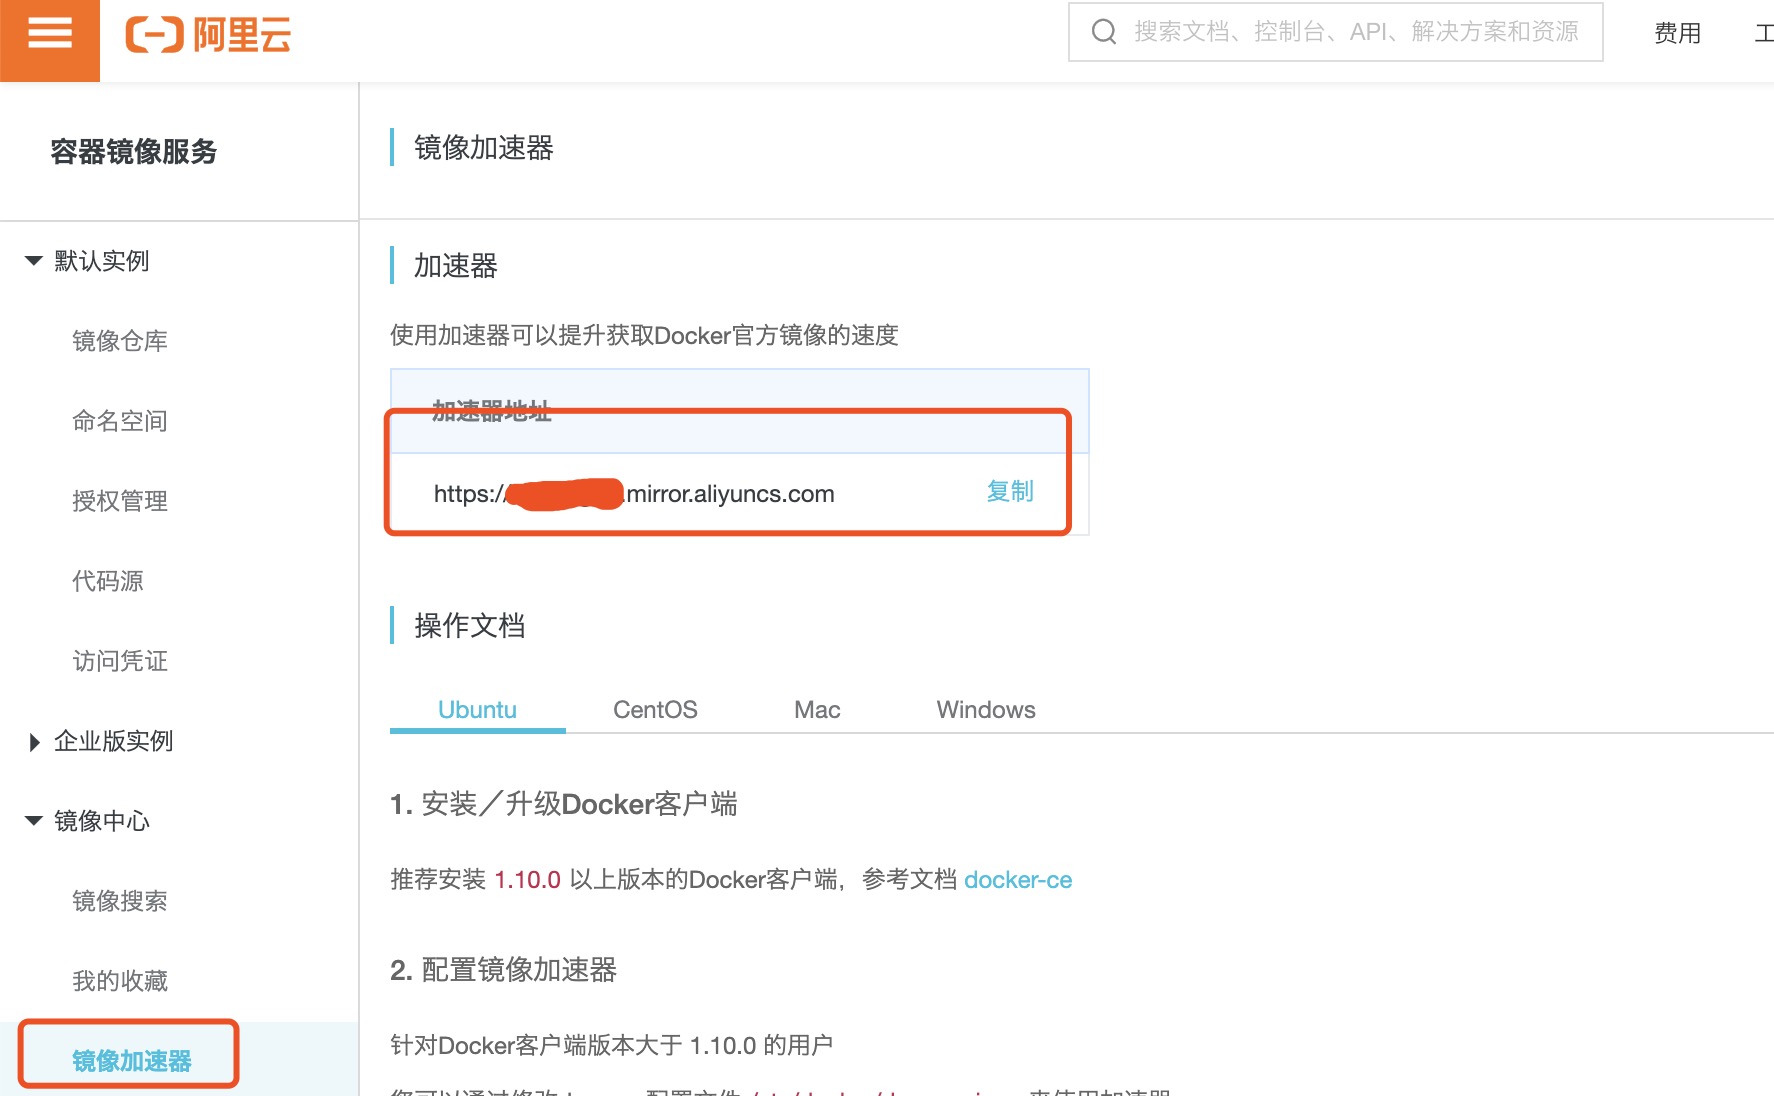
阿里云镜像获取地址:https://cr.console.aliyun.com/cn-hangzhou/instances/mirrors,登陆后,左侧菜单选中镜像加速器就可以看到你的专属地址了:
之前还有 Docker 官方加速器 https://registry.docker-cn.com ,现在好像已经不能使用了,我们可以多添加几个国内的镜像,如果有不能使用的,会切换到可以使用的镜像来拉取。 对于使用 Windows 10 的系统,在系统右下角托盘 Docker 图标内右键菜单选择 Settings,打开配置窗口后左侧导航菜单选择 Docker Engine。在 Registrymirrors 一栏中填写加速器地址 例如:https://registry.docker-cn.com ,之后点击 Apply 保存后 Docker 就会重启并应用配置的镜像地址了。
# docker 命令
1.拉取镜像
docker pull 镜像名
2.启动容器 以下命令使用 镜像名启动一个容器,参数为以命令行模式进入该容器:
docker run -it 镜像名 /bin/bash
参数说明:
-i: 交互式操作。 -t: 终端。 镜像名:镜像名。 /bin/bash:放在镜像名后的是命令,这里我们希望有个交互式 Shell,因此用的是 /bin/bash。 要退出终端,直接输入 exit
- 注意,如果你已经创建了容器,那你只需要启动容器,并且进入即可。 否则,你之前的改动不会在新创建的容器中生效。 查看之前创建的容器
docker container ls -a
可以通过命令docker container rename 来重命名你的容器。
docker container rename 本来的names 重命名的names
2
3.启动容器
docker start 容器名/names
4.进入容器
docker exec -ti 容器名/names /bin/bash
5.要退出终端,直接输入 exit
参考文档
https://www.runoob.com/docker/docker-mirror-acceleration.html
# docker工具拉取加速
在我们使用docker可能会遇到无法从Github下载东西的情况,会遇到如下情况:
- GitHub的raw.githubusercontent.com无法连接问题
- docker 容器出现sudo vi wget yum都不能使用的情况下换源
解决办法 1.进行apt-get 我们首先想到的办法肯定是安装,但是会发现这个过程需要不少时间,但是经过实践证明还是得等。
# 先更新我们的包管理工具
apt-get update
# 然后安装我们需要的vim,习惯了vim编辑
apt-get install vim
2
3
4
5
有了vim之后就好办了。
2.换源,对于win以及wsl使用、linux、docker都适用 更换apt源,查看系统版本:
lsb_release -a
修改 /etc/apt/sources.list
vi /etc/apt/source.list
替换
# 阿里云源
deb http://mirrors.aliyun.com/ubuntu/ bionic main restricted universe multiverse
deb http://mirrors.aliyun.com/ubuntu/ bionic-security main restricted universe multiverse
deb http://mirrors.aliyun.com/ubuntu/ bionic-updates main restricted universe multiverse
deb http://mirrors.aliyun.com/ubuntu/ bionic-backports main restricted universe multiverse
##測試版源
deb http://mirrors.aliyun.com/ubuntu/ bionic-proposed main restricted universe multiverse
# 源碼
deb-src http://mirrors.aliyun.com/ubuntu/ bionic main restricted universe multiverse
deb-src http://mirrors.aliyun.com/ubuntu/ bionic-security main restricted universe multiverse
deb-src http://mirrors.aliyun.com/ubuntu/ bionic-updates main restricted universe multiverse
deb-src http://mirrors.aliyun.com/ubuntu/ bionic-backports main restricted universe multiverse
##測試版源
deb-src http://mirrors.aliyun.com/ubuntu/ bionic-proposed main restricted universe multiverse


# 清华大学源
deb http://mirrors.tuna.tsinghua.edu.cn/ubuntu/ bionic main restricted universe multiverse
deb http://mirrors.tuna.tsinghua.edu.cn/ubuntu/ bionic-security main restricted universe multiverse
deb http://mirrors.tuna.tsinghua.edu.cn/ubuntu/ bionic-updates main restricted universe multiverse
deb http://mirrors.tuna.tsinghua.edu.cn/ubuntu/ bionic-backports main restricted universe multiverse
##測試版源
deb http://mirrors.tuna.tsinghua.edu.cn/ubuntu/ bionic-proposed main restricted universe multiverse
# 源碼
deb-src http://mirrors.tuna.tsinghua.edu.cn/ubuntu/ bionic main restricted universe multiverse
deb-src http://mirrors.tuna.tsinghua.edu.cn/ubuntu/ bionic-security main restricted universe multiverse
deb-src http://mirrors.tuna.tsinghua.edu.cn/ubuntu/ bionic-updates main restricted universe multiverse
deb-src http://mirrors.tuna.tsinghua.edu.cn/ubuntu/ bionic-backports main restricted universe multiverse
##測試版源
deb-src http://mirrors.tuna.tsinghua.edu.cn/ubuntu/ bionic-proposed main restricted universe multiverse
2
3
4
5
6
7
8
9
10
11
12
13
14
15
16
17
18
19
20
21
22
23
24
25
26
27
28
29
30
31
32
Esc+:+wq保存退出。
3.修改hosts
vi /etc/hosts
2
添加以下内容保存即可(IP地址查询后相应修改,可以ping不同IP的延时 选择最佳IP地址)
140.82.114.4  github.com
199.232.5.194 github.global.ssl.fastly.net
140.82.114.9  codeload.github.com
185.199.108.133 raw.githubusercontent.com
assets-cdn.github.com
185.199.108.153
185.199.109.153
185.199.110.153
185.199.111.153
//上面的网址IP也许会发生变化,这样就要对应修改ip


GitHub的网址IP可能会变化,可以用下面的网址查
[https://www.ipaddress.com/](https://www.ipaddress.com/)
2
3
4
5
6
7
8
9
10
11
12
13
14
重启网络
sudo service networking restart
#or
/etc/init.d/networking restart
2
3
4
参考文档
https://www.codenong.com/cs106177126/
https://www.ioiox.com/archives/62.html
https://blog.csdn.net/weixin_44598727/article/details/108300731?utm_source=app
https://blog.csdn.net/weixin_43745072/article/details/105667075?utm_source=app
https://blog.csdn.net/weixin_38890593/article/details/94624056