# 引言
由于电脑带不动虚拟机,而WSL可以使用vscode在win10和WSL直接联合开发(香)
# WSL安装
# 2022/03/09安装
https://docs.microsoft.com/zh-cn/windows/wsl/install
# 2020年前安装方式
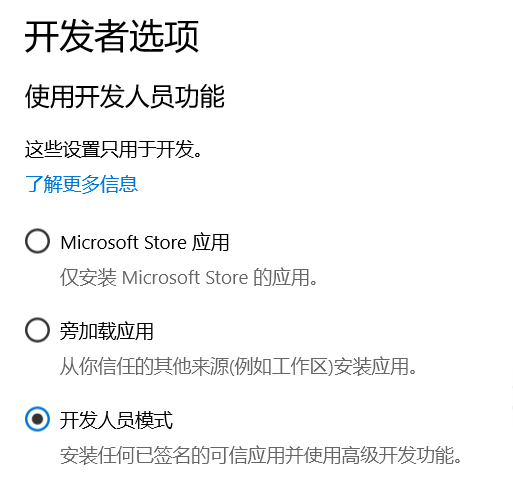
1.在设置->更新与安全->开发者选项中开启开发人员模式
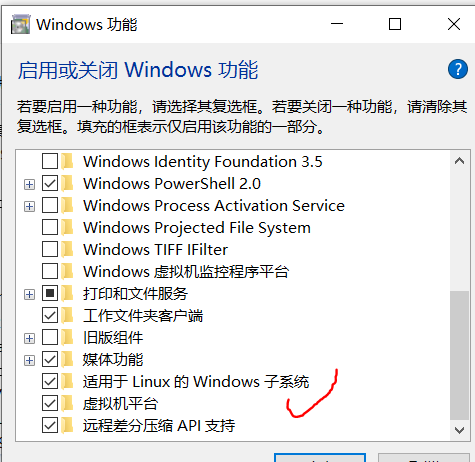
 2.在控制面板开启 “适用于 Linux 的 windows 子系统”
 3. 通过Windows应用商店,可以安装自己喜欢的 Linux 发行版,例如Ubuntu 20.04 LTS及以上版本
初次进入Linux子系统需要设置Linux的用户名及密码,之后就不能在输入了,不过用户名密码还是需要记住的,特别是密码
安装完成可以换源加快wsl下载速度,以清华源为例。
3. 通过Windows应用商店,可以安装自己喜欢的 Linux 发行版,例如Ubuntu 20.04 LTS及以上版本
初次进入Linux子系统需要设置Linux的用户名及密码,之后就不能在输入了,不过用户名密码还是需要记住的,特别是密码
安装完成可以换源加快wsl下载速度,以清华源为例。
一:备份原来的源
sudo cp /etc/apt/sources.list /etc/apt/sources_init.list
2
注意,我们操作Ubuntu一般都是要在管理员权限下进行操作的,尤其是要对系统文件进行更改。sudo就是告诉系统使用管理员权限运行后面的命令。敲入回车后输入我们之前设置的密码即可运行。 二:更换apt源,查看系统版本:
lsb_release -a
修改 /etc/apt/sources.list
sudo vim /etc/apt/sources.list
将文件里的内容全部删除(可在vim的命令模式下,使用gg将光标移到文件首行,使用dG命令清空文件),敲入i进入编辑模式,将下面内容粘贴进文件
18.04清华软件源:
# 默认注释了源码镜像以提高 apt update 速度,如有需要可自行取消注释
deb https://mirrors.tuna.tsinghua.edu.cn/ubuntu/ bionic main restricted universe multiverse
# deb-src https://mirrors.tuna.tsinghua.edu.cn/ubuntu/ bionic main restricted universe multiverse
deb https://mirrors.tuna.tsinghua.edu.cn/ubuntu/ bionic-updates main restricted universe multiverse
# deb-src https://mirrors.tuna.tsinghua.edu.cn/ubuntu/ bionic-updates main restricted universe multiverse
deb https://mirrors.tuna.tsinghua.edu.cn/ubuntu/ bionic-backports main restricted universe multiverse
# deb-src https://mirrors.tuna.tsinghua.edu.cn/ubuntu/ bionic-backports main restricted universe multiverse
deb https://mirrors.tuna.tsinghua.edu.cn/ubuntu/ bionic-security main restricted universe multiverse
# deb-src https://mirrors.tuna.tsinghua.edu.cn/ubuntu/ bionic-security main restricted universe multiverse

# 预发布软件源,不建议启用
# deb https://mirrors.tuna.tsinghua.edu.cn/ubuntu/ bionic-proposed main restricted universe multiverse
# deb-src https://mirrors.tuna.tsinghua.edu.cn/ubuntu/ bionic-proposed main restricted universe multiverse
2
3
4
5
6
7
8
9
10
11
12
13
20.04清华软件源:
#添加阿里源
deb http://mirrors.aliyun.com/ubuntu/ focal main restricted universe multiverse
deb-src http://mirrors.aliyun.com/ubuntu/ focal main restricted universe multiverse
deb http://mirrors.aliyun.com/ubuntu/ focal-security main restricted universe multiverse
deb-src http://mirrors.aliyun.com/ubuntu/ focal-security main restricted universe multiverse
deb http://mirrors.aliyun.com/ubuntu/ focal-updates main restricted universe multiverse
deb-src http://mirrors.aliyun.com/ubuntu/ focal-updates main restricted universe multiverse
deb http://mirrors.aliyun.com/ubuntu/ focal-proposed main restricted universe multiverse
deb-src http://mirrors.aliyun.com/ubuntu/ focal-proposed main restricted universe multiverse
deb http://mirrors.aliyun.com/ubuntu/ focal-backports main restricted universe multiverse
deb-src http://mirrors.aliyun.com/ubuntu/ focal-backports main restricted universe multiverse
#添加清华源
deb https://mirrors.tuna.tsinghua.edu.cn/ubuntu/ focal main restricted universe multiverse
# deb-src https://mirrors.tuna.tsinghua.edu.cn/ubuntu/ focal main restricted universe multiverse
deb https://mirrors.tuna.tsinghua.edu.cn/ubuntu/ focal-updates main restricted universe multiverse
# deb-src https://mirrors.tuna.tsinghua.edu.cn/ubuntu/ focal-updates main restricted universe multiverse
deb https://mirrors.tuna.tsinghua.edu.cn/ubuntu/ focal-backports main restricted universe multiverse
# deb-src https://mirrors.tuna.tsinghua.edu.cn/ubuntu/ focal-backports main restricted universe multiverse
deb https://mirrors.tuna.tsinghua.edu.cn/ubuntu/ focal-security main restricted universe multiverse
# deb-src https://mirrors.tuna.tsinghua.edu.cn/ubuntu/ focal-security main restricted universe multiverse multiverse
2
3
4
5
6
7
8
9
10
11
12
13
14
15
16
17
18
19
20
21
按ESC(或Ctrl + [)退出编辑模式进入命令模式,然后先按“:”,再输入wq,敲入回车,文件即写入成功。
三:更新系统 输入下列命令,等待更新完毕~
sudo apt-get update
sudo apt-get upgrade
2
20.04默认源
# See http://help.ubuntu.com/community/UpgradeNotes for how to upgrade to
# newer versions of the distribution.
deb http://archive.ubuntu.com/ubuntu/ focal main restricted
# deb-src http://archive.ubuntu.com/ubuntu/ focal main restricted

## Major bug fix updates produced after the final release of the
## distribution.
deb http://archive.ubuntu.com/ubuntu/ focal-updates main restricted
# deb-src http://archive.ubuntu.com/ubuntu/ focal-updates main restricted

## N.B. software from this repository is ENTIRELY UNSUPPORTED by the Ubuntu
## team. Also, please note that software in universe WILL NOT receive any
## review or updates from the Ubuntu security team.
deb http://archive.ubuntu.com/ubuntu/ focal universe
# deb-src http://archive.ubuntu.com/ubuntu/ focal universe
deb http://archive.ubuntu.com/ubuntu/ focal-updates universe
# deb-src http://archive.ubuntu.com/ubuntu/ focal-updates universe

## N.B. software from this repository is ENTIRELY UNSUPPORTED by the Ubuntu
## team, and may not be under a free licence. Please satisfy yourself as to
## your rights to use the software. Also, please note that software in
## multiverse WILL NOT receive any review or updates from the Ubuntu
## security team.
deb http://archive.ubuntu.com/ubuntu/ focal multiverse
# deb-src http://archive.ubuntu.com/ubuntu/ focal multiverse
deb http://archive.ubuntu.com/ubuntu/ focal-updates multiverse
# deb-src http://archive.ubuntu.com/ubuntu/ focal-updates multiverse

## N.B. software from this repository may not have been tested as
## extensively as that contained in the main release, although it includes
## newer versions of some applications which may provide useful features.
## Also, please note that software in backports WILL NOT receive any review
## or updates from the Ubuntu security team.
deb http://archive.ubuntu.com/ubuntu/ focal-backports main restricted universe multiverse
# deb-src http://archive.ubuntu.com/ubuntu/ focal-backports main restricted universe multiverse

## Uncomment the following two lines to add software from Canonical's
## 'partner' repository.
## This software is not part of Ubuntu, but is offered by Canonical and the
## respective vendors as a service to Ubuntu users.
# deb http://archive.canonical.com/ubuntu focal partner
# deb-src http://archive.canonical.com/ubuntu focal partner

deb http://security.ubuntu.com/ubuntu/ focal-security main restricted
# deb-src http://security.ubuntu.com/ubuntu/ focal-security main restricted
deb http://security.ubuntu.com/ubuntu/ focal-security universe
# deb-src http://security.ubuntu.com/ubuntu/ focal-security universe
deb http://security.ubuntu.com/ubuntu/ focal-security multiverse
# deb-src http://security.ubuntu.com/ubuntu/ focal-security multiverse
2
3
4
5
6
7
8
9
10
11
12
13
14
15
16
17
18
19
20
21
22
23
24
25
26
27
28
29
30
31
32
33
34
35
36
37
38
39
40
41
42
43
44
45
46
47
48
49
(二)设置远程连接
一、系统本身自带的SSH有问题,需要remove一下,重新install一下
sudo apt-get remove openssh-server
二、然后重新安装
sudo apt-get install openssh-server
三.然后就是配置ssh的配置文件:
打开配置文件:
sudo vim /etc/ssh/sshd_config
2
写入:
Port 2222   #设置ssh的端口号, 由于22在windows中有别的用处, 尽量不修改系统的端口号
PermitRootLogin yes   # 可以root远程登录
PasswordAuthentication yes     # 密码验证登录
AllowUsers user # 远程登录时的用户名
2
3
4
重启服务:
sudo service ssh restart
这个时候你自己电脑上的xhell等远程工具是可以连接的了, 但是想要在其他的计算机上访问, 就需要系统开放端口了.
这是后需要到防火墙设置开放2222端口
防火墙->高级设置->入站规则->新建规则

端口->下一步
选择tcp 特定本地端口

允许连接, 默认都选上, 下一步填个名字 完成就可以远程或者本地进行wsl开发,原理及过程就相当于一台Linux,可能还有远程的时候可能需要在wsl重启一下ssh,有时使用xshell连接会connect failed,只要sudo service ssh restart一下就行,所以既然都打开了wsl,为啥不直接在wsl的Ubuntu上搞呢。。。。。
3.远程sftp服务 http://filezilla-project.org/download.php?type=client
- xftp
https://www.netsarang.com/zh/all-downloads/
https://docs.microsoft.com/zh-cn/windows/wsl (官方文档,遇事不决,找他可以解决99%问题)
# win操作
Shit+右键——Linux shell
https://www.cnblogs.com/jetttang/p/8186315.html
# 停止LxssManager服务
net stop LxssManager
# 启动LxssManager服务
net start LxssManager
# WSL1升级为WSL2
- 查看当前WSL版本号
wsl -l -v
- 检查运行WSL2的系统要求 WSL2对系统版本有一定要求,键盘选择Win + R,输入winver,点击回车,便可查看当前系统的详细版本。看一下是否满足要求,如果不满足要求,则需要对系统进行升级
系统要求
×64:version>=1903,build>=18362 arm64:version>=2004,build>=19041
下载 Linux 内核更新包 根据系统进行选择: x64:https://wslstorestorage.blob.core.windows.net/wslblob/wsl_update_x64.msi arm64:https://wslstorestorage.blob.core.windows.net/wslblob/wsl_update_arm64.msi
运行上一步下载的更新包。
设置分发版版本 打开PowerShell,执行命令 :
wsl --set-version 分发版名称 版本号
例如,将Ubuntu20.04 设置为WSL2的命令为
wsl --set-version Ubuntu-20.04 2
wsl2简介 https://docs.microsoft.com/zh-cn/windows/wsl/about
备注
WSL1更新到WSL2之后发现以前可以从Window文件系统中直接访问的Linux文件的方式不能用了后来在对比了官网的描述之后,原来是WSL2 建议不要跨操作系统使用文件。但是我们仍然可以通过以下方式直接在Window系统的基础上访问到Linux的文件,比如我安装的是Ubuntu-18.04,那么可以通过以下方式
\\wsl$\Ubuntu-18.04\
值得一提的是,微软为我们提供了一个默认的变量(wsl$ )可以直接指向WSL的目录,我们可以在运行(win+R)或资源管理器的路径里直接输入\wsl$进入Ubuntu的目录
注意
更新wsl2之后可能会出现dns解析错误(也许是),目前还没有找到一个好的解决办法,而该问题会引起apt update 失败,导致很多奇怪的问题
# 笔记
# vscode连接wsl,无法创建文件与修改文件
使用wsl进行开发时遭遇问题:无法创建文件与修改文件,提示:没有权限 解决方法:在wsl控制台将你需要的目录赋予你账户的权限
sudo chown -R wsl系统用户名 /home/wsl系统用户名或目录/
请将用户名换成自己系统用户名,且目录换成需要操作的目录 但是如果不熟悉Linux操作系统,会出现用户被更改无法正常使用wsl,比如更改了root用户,出现以下报错
sudo: /etc/sudoers is owned by uid 1000, should be 0
sudo: no valid sudoers sources found, quitting
sudo: unable to initialize policy plugin
2
3
这时首先运行以下命令
su -root
它会要求输入密码,然后一一运行以下命令
chown root:root /etc/sudoers
chmod 440 /etc/sudoers
chown -R root:root /etc/sudoers.d
chmod  755 /etc/sudoers.d
chmod  440 /etc/sudoers.d/*
2
3
4
5
# WSL2的网络代理配置
目的是使用win下的代理实现科学上网。
# 方法一
1.WSL2获取Win10的ip 在Win10 -> WSL2这个方向, 是可以直接通过Localhost来访问的, 但是WSL2 -> Win10这个方向就不能直接访问Localhost了, 需要指定Win10的ip, 想要查看WSL2中Win10的ip, 只需要查看resolve.conf文件 :
cat /etc/resolv.conf
可以得到输出信息
# This file was automatically generated by WSL. To stop automatic generation of this file, add the following entry to /etc/wsl.conf:
# [network]
# generateResolvConf = false
nameserver 172.17.224.1
2
3
4
其中172.17.224.1就是在WSL2中Win10的ip.
想要方便获取这个IP, 可以直接使用下方命令 :
cat /etc/resolv.conf|grep nameserver|awk '{print $2}'
2.WSL2设置环境变量 由于上面已经可以获取到Win10的ip, 这个时候就可以很方便的对各种环境变量进行设置, 因为默认socks5端口为7890, 所以可以直接设置环境变量 :
export windows_host=`cat /etc/resolv.conf|grep nameserver|awk '{print $2}'`
export ALL_PROXY=socks5://$windows_host:7890
export HTTP_PROXY=$ALL_PROXY
export http_proxy=$ALL_PROXY
export HTTPS_PROXY=$ALL_PROXY
export https_proxy=$ALL_PROXY
2
3
4
5
6
git也可以设置为使用代理 :
git config --global proxy.https socks5://$windows_host:7890
如果想要这些环境变量和设置每次启动终端都生效, 可以在~/.bashrc文件最下方添加上述内容 :
export windows_host=`cat /etc/resolv.conf|grep nameserver|awk '{print $2}'`
export ALL_PROXY=socks5://$windows_host:7890
export HTTP_PROXY=$ALL_PROXY
export http_proxy=$ALL_PROXY
export HTTPS_PROXY=$ALL_PROXY
export https_proxy=$ALL_PROXY

if [ "`git config --global --get proxy.https`" != "socks5://$windows_host:7890" ]; then
            git config --global proxy.https socks5://$windows_host:7890
fi
2
3
4
5
6
7
8
9
10
# 方法二
WSL2配置代理的时候设置所有代理为clash 虚拟机映射IP加上clash里面的端口,默认是7890。首先在WSL每次启动的时候,获取当前的ip,并设置代理
可编辑/etc/profile
sudo vim /etc/profile
转到文件最末尾,添加以下两行
host_ip=$(cat /etc/resolv.conf |grep "nameserver" |cut -f 2 -d " ") export ALL_PROXY="http://$host_ip:7890"
$host_ip即为配置代理的时候需要设置的ip地址,注意第二行,最后的7890,这是clash默认代理的端口号,最后
source /etc/profile
检查代理是否生效
curl google.com
两个办法最后都要在win系统设置代理允许局域网链接,且代理可以通过win防火墙
# shell脚本执行错误 $'\r':command not found
出现这种错误是因为编写的 shell脚本是在win下编写的,每行结尾是\r\n 的而Unix结果行是\n
所以在Linux下运行脚本 会任务\r 是一个字符,所以运行错误,需要把文件转换下,
运行脚本 :
dos2unix 脚本名